使用hugo+jsdelivr+typora+vercel打造静态博客的步骤
Overview
使用hugo+github+jsdelivr+typora+vercel打造静态博客的步骤与关键
步骤说明
此文的阅读对象主要是有开发背景的同学,内容是讲述静态博客的打造思路。
- Typora - markdown格式博文的写作工具,方便我们日常编写博客文章。
- Github - markdown格式博客文章 + image文件的仓库,主要用来存储编写的博客,通常需要配合git版本控制工具使用。
- Hugo - 静态网站的“编译”工厂,输入原料是markdown格式的博客文章+静态image文件,输出则是静态的html博客文件。
- Jsdelivr - 免费的CDN加速服务提供商,可以给我们的静态博客的图片、视频进行加速。
- vercel - 免费的静态网站编译、托管工具,提供一站式的网站托管服务。

静态网站的痛点有哪些?
图片备份与稳定加速
静态网站的痛点是图片的托管,要兼顾稳定性与备份的需要。出于备份的需要,我们 要求图片必须保存在github中;稳定性呢,则要么使用付费的第三方图片存储与加速服务(比如阿里云,七牛云),要么使用免费但稳定的jsdelivr图片加速服务,它可以与github代码库无缝集成,任何代码库中的图片,均可以使用如下格式直接进行加速访问:
1https://cdn.jsdelivr.net/gh/{GITHUB用户名}/{GITHUB代码库名}/图片在仓库中的相对路径.图片后缀
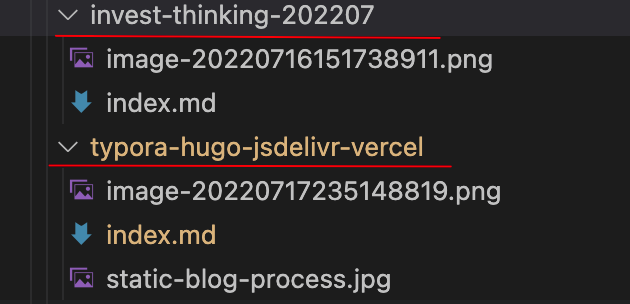
而hugo正好有一项pageBundles功能,其核心是将每一篇文章的markdown文件与图片组织在一个目录下,其中目录名编译后对应文章名,markdown文件名则统一为index.md。比如我的两篇文章组织形式如下:

开启pageBundles的步骤
-
文章组织形式按上面图片类似的格式进行 组织。
-
每篇博文中(index.md)指定:
usePageBundles: true1--- 2title: '使用hugo+jsdelivr+typora+vercel打造静态博客的步骤' 3description: '使用hugo+jsdelivr+typora+vercel打造静态博客的步骤' 4summary: "使用hugo+jsdelivr+typora+vercel打造静态博客的步骤" 5date: '2022-07-17' 6author: '飞天' 7usePageBundles: true 8toc: true 9--- -
主题中负责图片渲染src的地方稍做修改:
比如我就在themes/hugo-clarity/layouts/partials/figure.html中修改了渲染的逻辑
 1{{/*
 2  If Hugo has been able to access the image, it's loaded at .image, and we have
 3  access to additional attributes.
 4
 5  If Hugo hasn't been able to access the image, it's loaded at .file, with only
 6  its path available.
 7
 8  We set the Hugo variables to strings to allow for logical operations and
 9  replacements.
10*/}}
11
12{{- $file := .file -}}
13{{- $image := .image -}}
14{{- $diskPath := .diskPath -}}
15{{- $webPath := .webPath -}}
16{{- $alt := .alt -}}
17{{- $cap := .cap -}}
18{{- $classes := .classes -}}
19{{- $bundle := .bundle -}}
20
21{{- $fileWeb := .file -}}
22{{- if eq $bundle true -}}
23  {{ $fileWeb = path.Join $webPath $file }}
24  {{ if in $classes "image_svg" }}
25    {{ if strings.HasPrefix $file "http" }}
26      {{ $fileWeb = $file }}
27    {{- end -}}
28  {{- end -}}
29{{- end -}}
30
31<figure>
32  <picture>
33
34    {{/* Generate alternate image format tags. */}}
35    {{- with $file -}}
36      {{ $name := replace $file (path.Ext $file) "" }}
37      {{ $ext := slice "avif" "webp" "jxl" }}
38      {{- range $ext -}}
39        {{ $item := printf "%s" . | printf "%s%s" "." | printf "%s%s" $name | printf "%s" }}
40        {{ $itemDisk := path.Join $diskPath $item }}
41        {{ $itemWeb := path.Join $webPath $item }}
42        {{- if fileExists $itemDisk -}}
43          <source srcset="{{ $itemWeb }}" type="image/{{ . }}">
44        {{- end -}}
45      {{- end -}}
46    {{- end -}}
47
48    {{/* Render image and attributes. */}}
49    <img
50      loading="lazy"
51      decoding="async"
52      alt="{{ htmlEscape $alt }}"
53      {{ with $image }}
54        class="{{ $classes }} image_processed"
55        width="{{ .Width }}"
56        height="{{ .Height }}"
57        {{ if eq $bundle true }}
58          src="https://cdn.jsdelivr.net/gh/tfnick/blog/content{{ .RelPermalink }}"
59        {{ else }}
60          src="{{ .RelPermalink }}"
61        {{ end }}
62      {{ else }}
63        class="{{ $classes }} image_unprocessed"
64        src="{{ $fileWeb }}"
65      {{ end }}
66      {{ with $cap }}
67        title="{{ htmlEscape $cap }}"
68      {{ end }}
69    />
70
71    {{/* Provide caption based on image title, if it is set. */}}
72    {{- with $cap -}}
73      {{- if not (eq $cap " ") -}}
74        <figcaption class="{{ replace $classes "image" "caption" }}">{{ $cap | safeHTML }}</figcaption>
75      {{- end -}}
76    {{- end -}}
77
78  </picture>
79</figure>
其中即是修改之处:
1        {{ if eq $bundle true }}
2          src="https://cdn.jsdelivr.net/gh/tfnick/blog/content{{ .RelPermalink }}"
3        {{ else }}
4          src="{{ .RelPermalink }}"
5        {{ end }}
图片插入的便捷性
图片的插入便捷性通过typora来解决,包括:
- 截图插入,需要能保证图片能自动存储到index.md所在目录
- 如果引用(复制)的第三方网站的文章与图片,需要保证图片能自动保存到计算机本地index.md所在的目录
- 插入本地的图片,也需要能保证可以自动复制图片到index.md所在目录
所幸的是,typora只需要经过简单的配置即可达到上述要求。
注此方案下,不再需要使用pigGo等图片上传工具将 图片上传到jsdelivr,更进一步的简化了博文的编写。
vercel网站托管
vercel与github配置好之后,其可以指定hugo的版本,自动编译html并发布到vercel的容器中,配置好自有域名之后,基本上可谓一劳永逸。
优势
一个静态博客配置完成之后,通过typora编写文章,通过git提交到github,后续的发布全部由vercel自动完成,写作者不再需要关注,可以真正享受写文章的乐趣,NICE~